Adjusting air compressor pressure switch can be difficult and taxing for many people. Because of this, they resort to asking for professional help. However, if you learn to do it by yourself, you will save lots of money.
It is important that it becomes part of your skill set because you never know when you will be needing it.
Cut-in and Cut-out Pressure
The cut-in and the cut-out pressure are the two set points of a compressor. In simple terms, this is the pressure point at which the compressor starts (cut-in pressure) or stops (cut-out pressure) running. Basically, when the compressor reaches the cut-out pressure, it will stop. The pressure will then decrease until it reaches the cut-in pressure. This drop will then cause the compressor to start again.
The difference between the two points is known as the pressure differential or pressure band. This differential is a critical matter. Since it determines the length of time that the compressor is at rest or is running, it should not be set too small. If it is, the motor will stop and then start again quickly. This can cause damage not just to the motor but to the other parts of the compressor as well.
Adjusting Pressure Switch
Unlike the pressure of large air compressors which is adjusted using the central controller, the pressure of small compressors can be adjusted using the pressure switch. Although a pressure switch comes in different designs and models, there is a uniform approach to adjusting it.
The entire process can be divided into two major sections:
- Setting the cut-in pressure.
- Setting the cut-out pressure.
Steps in Setting the Cut-in Pressure
Set the cut-in pressure first before adjusting the cut-out pressure. First, check if the tank is empty. Start the compressor and let it operate until it reaches the level of the cut-out pressure. Let a small amount of air to escape by opening a drain. You should be able to observe the decrease in pressure through the pressure gauge. Wait until the compressor starts to run. Take note of the pressure and write it down. This is your cut-in pressure.
Use the big set screw to adjust the cut-in pressure. To increase, turn it clockwise. Close the drain valve. The compressor will run again until it reaches the cut-out pressure. Repeat this cycle until you have correctly set the cut-in pressure. Remember to open a drain to let the air escape then wait until the compressor starts. Note the pressure at which it starts again and adjust accordingly.
After repeating the cycle for a couple of times, you should have already adjusted the cut-in pressure to the correct level.
If you want to do it more quickly, you may also do certain techniques. When you have observed that the pressure has dropped already below the desired cut-in pressure, quickly close the drain valve so that the pressure remains constant. Similarly, adjust the big-set screw clockwise until the compressor starts. You may turn the screw a little further until you reach the cut-in pressure that you want.

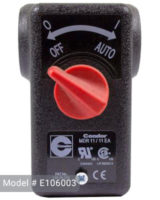
Air Compressor Pressure Switch Adjustment. Condor MDR11
Setting the Cut-out Pressure
Setting the cut-out pressure is basically the same as setting the cut-in pressure. The difference is that you will only touch the set-screw for the differential pressure. However, if the model of the pressure switch that you have does not have this set-screw, it means that you have a fixed differential pressure. If this is the case, there is no need for you to do the next few steps.
First, note the pressure at which the machine stopped operating the last time you run it. According to your needs, adjust the differential accordingly. Remember that turning the screw clockwise will increase the differential while turning it counter-clockwise will decrease the differential. Increasing the differential will give you a higher maximum pressure while decreasing it will give you a lower maximum pressure.
Again, open the drain valve to let the pressure drop. This will signal the compressor to start again. Wait for this to happen then close the drain valve. Wait for the compressor to stop then check the cut-out pressure. Repeat the cycle.
Things to Remember in Air Compressor Pressure Switch Adjustment
As mentioned, although the steps dictated is one of most common approaches to adjusting your pressure switch, the proper way can still vary depending on the type of pressure switch that you have. Make sure that you read the manual before doing anything on the pressure switch. Do not turn the set-screw immediately after getting it out of the box. Check the pre-set factory settings first to determine the cut-in and differential pressure.
You always have a say on the level of pressure that you want. However, the basic rule is to set the pressure as low as possible for the task that you will be doing. For example, if the air compressor that you bought has a maximum pressure of up to 6 bar but you will only be doing a light-duty task that requires 4 or 5 bar, it’s better to adjust the pressure. You will not only have a more appropriate output but also, you will be able to save energy. Eventually, you will spend less money once you set the pressure at a lower level.
When adjusting the cut-in and cut-out pressure, always compute for the differential. It is very easy to do this because you just have to subtract the two. Again, the differential should never be too small to allow the motor to have an ample amount of rest. The motor needs to cool first to avoid overheating. Depending on the model of your air compressor, there is usually a recommended differential that is appropriate for its motors.
It is fairly easy to adjust air compressor pressure switch, right? Just practice first with the help of a professional then do it by yourself the next time. Don’t forget the important tips for your own safety.